Showing posts with label Computer tricks and tips. Show all posts

Wednesday, 2 April 2014

How To Show Hidden Files And Folders In windows8


Show Hidden Files And Folders In windows8

In This Tutorial You learn How to show hidden files and folders temporary or permanently.
Some of the folder and files in windows are hidden so if we want to show them this tutorial helps you.


Steps :
First Open The folder Where Hidden Files and Folders On the left top you see a view button click on that then you see The hidden item box click on that and you hidden files and folders visible temporary.
Show Hidden Files And Folders In windows8
Now if you want show this folders permanently follow this steps
Select The Files or folder and right click Then click on properties
Show Hidden Files And Folders In windows8
Unchecked The Hidden and Click on OK button

Show Hidden Files And Folders In windows8
Then A pop up open simple click on OK again And you files will be now visible permanently
Show Hidden Files And Folders In windows8
Thanks please comment and share the tutorial

How To Hide Files And Folders in Windows 8 and 8.1


Hide Files And Folders in Windows 8
In this tutorial You learn How to hide files and folders in windows 8 and windows 8.2.Its just 2 steps to do this.


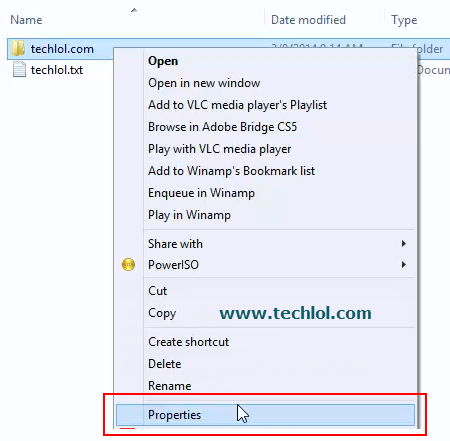
First of all open right click on the folder or file which you want to hide

Hide Files And Folders in Windows 8
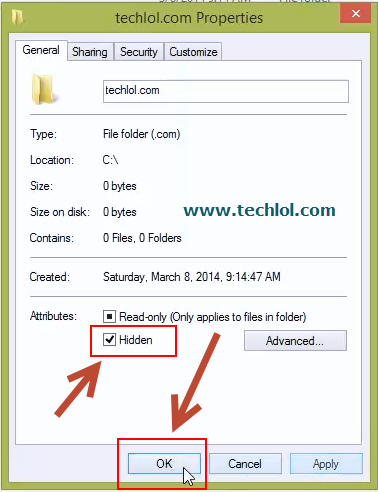
Then select the hidden option and press okey its done


Hide Files And Folders in Windows 8

Video tutorial

Saturday, 8 March 2014

How to create folder without name in windows

create folder without name in windows
Hello Friends Today I post a very cool trick to impress your friends This trick will allow you to make folder without any name. This trick works on any windows  operating system.


Steps to create a folder without name.
Step 1 :   Open the Folder where you want to make this and right click on blank screen               Right Click » New »Folder
create folder without name in windows

Step 2 : Then again Right click on folder » rename

create folder without name in windows step 2

Step 3 : Then type » Alt+255
create folder without name in windows step 3

Step 4 : And You will see your folder like image Press enter to make your folder without name


create folder without name in windows step 4
How to create folder without name in windows Video

Saturday, 22 February 2014

How To Increase Buffering Speed In With YouTube Feather


Increase Youtube Buffering Speed With Youtube dns


Hello Friends Welcome to Techlol.com You feel very irritate when we play YouTube video and its start buffering so don't worry in this tutorial i will tell you a easy and simple way to increase the YouTube  video buffering speed.IN this part we will discuss  YouTube's 'Feather' Its the best way to increase YouTube buffering speed using this method You won’t see too many comments. You won’t be able to like or dislike the video. You will get  5 suggested or related videos
Read Also : 

Steps :
1. Open  https://www.youtube.com/feather_betaand click on Join The Feather" beta. 
Increase Youtube Buffering Speed With Youtube dns

2. Now open any YouTube video and you will see the speed is increased  and you will see a new option in your YouTube Which i display in image 
Increase Youtube Buffering Speed With Youtube dns


Just this once : click on this link if you just want to see this video in light version
Permanently : Click on this link if you want this lighter version for YouTube permanently.

3. If You click on permanently and want to leave the ‘Youtube Feather’ again open  https://www.youtube.com/feather_beta
Increase Youtube Buffering Speed With Youtube dns


And click on Leave the “Feather” Beta
Read also : Speedup Youtube Buffering Speed With YouTube DNS Servers

Monday, 21 October 2013

Change windows update setting and speed up internet

Change windows update setting and speed up internet
How to change the windows update setting in your computer/laptop?

Hello friends, As you all would be aware of the fact that windows update is important for our windows, but it uses a large  part of our internet’s data.So, today I will tell you how to change the settings of your windows, which in turn will help you save a lot of your internet data.
You just have to do some steps to do this thing.
Steps : 
First of all you have to open your control panel if not found press window + r  and type control in input box press enter.After open the control panel 
Set Large icon  so its easy to find windows update setting
windows update setting
Now You have to click on change setting in the left side of your screen
windows update setting
Here we have 3 option
  1. Install updates automatically
  2. Download updates but let me choose whether to install them
  3. Check for updates But let me choose whether to download and install them
  4. Never check for updates

Now you have to check 4th option never check for updates and Also uncheck the recommended updates option.
windows update setting
When you select the option don't forgot to click on OK button on the right bottom side on the screen.
save windows update setting
This post is just for those who have slow internet connection or limited access plan if you have unlimted plan or high speed internet please update you windows automatically so that you can enjoy the new fetures.
Thanks.....
Don't forgot to Like our Facebook page

disable usb autorun autoplay in windows

disable usb autorun autoplay in windows
How to Disable usb to autorun or autoplay?

Hello Friends when you install new window or buy new laptop and attach any usb device with it,This will open Automatically.Its Harmful for your computer or laptop.So after read this post its easy to disable auto play or autorun automatically.Here is the steps to disable usb autorun/autoplay.


Read also : How To Control Media Player With Hand Gestures In Laptop

Steps :
First of all you have to open your control panel if not found press window + r  and type control in input box press enter.After open the control panel
Set View By Category so its easy to operate
Click on Hardware and Sound Setting
disable usb autorun autoplay in windows
After Click on Hardware and Sound Setting a new window will open
Now Click on Change default settings for media or devices under Autoplay
disable usb autorun autoplay in windows
When you click on this again a new window open and now click on the drop down front of Removable drive and choose a option Ask me every time
disable usb autorun autoplay in windows
If you like our post then tell our friends If not tell us post your reviews in comment.
Like us on facebook for computer tricks and tips

Sunday, 28 April 2013

Make Wifi Hotspot in window 8 or 7 with CMD


Hello Friends Today i post That how to make wifi hotspot in windows 8 and windows 7 with commands So you can easily make this.In windows 8 we are not able to make a wifi hotspot without commands.
What is Hotspot?
A hotspot is a site that offers Internet access over a wireless local area network (WLAN) through the use of a router connected to a link to an Internet service provider. Hotspots typically use Wi-Fi technology.
So Now we start the tutorial ok.
Read Also : How To Invite all Friends To Facebook Page Code 2014

How To Increase Buffering Speed In With YouTube Feather

Steps :
1. Open cmd  with Run as administrator access
Make Wi-Fi Hotspot in window 8 or 7 with CMD
 2. Paste the Following commands
             1. netsh wlan show drivers ( this option is show you drivers detail if you ignore this don’t worry this is not much important)
Make Wi-Fi Hotspot in window 8 or 7 with CMD


2. netsh wlan set hostednetwork mode=allow ssid=mynetwork key=mypassword
3. netsh wlan start hostednetwork
wifi hotspot cmd

3. Now its time to open Network and Sharing center
                Path : Control Panel > Network and Internet > Network and Sharing Center
Make Wi-Fi Hotspot in window 8 or 7 with CMD
Now click on first Connection which connected with another internet connection its LAN or a Wi-Fi
A dialog box open like the next image.

Make Wi-Fi Hotspot in window 8 or 7 with CMD


Now click on Properties.A new pop up window is open now click on Sharing  > tick on Allow other network users to connect through this computer’s Internet Connection and then click on OK it allow you internet to share with the Wi-Fi hotspot which you create and its done.
Make Wi-Fi Hotspot in window 8 or 7 with CMD


Now enjoy and connect with your mobile lappi and etc.
--------------
Some other things
 Don’t use CAPITAL LETTERS in ssid.
 Don’t delete connection in network and sharing center


If you want to remove this network again open cmd with Run as administrator and type this commands
netsh wlan set hostednetwork mode=allow ssid=mynetwork
 netsh wlan stop hostednetwork
Make Wi-Fi Hotspot in window 8 or 7 with CMD


Please share our post and tell about site.


Friday, 11 January 2013

Simple Tweaks to Make Firefox Faster


Mozilla Firefox has attained quite a bit of popularity in the recent years. Although most of the Firefox versions are fast, few tweaks can make it even faster and still maintain the quality and performance. Following are some of the easy, but popular tweaks of Firefox that would help you to make Firefox faster than ever.
make firefox load faster

Enable Network Pipelining

Naturally, the browsers are very gracious. They send a request to the servers and then wait for the response to continue. Network pipelining is an adamant method that allows Firefox to send several requests to reduce the page loading time & will make firefox faster.
Go through the following steps to enable Network Pipelining
  • Type “about: config” in the browser’s address box and hit Enter.
  • Find “network.http.pipelining” click twice on it, in order to change the option to ‘True’.
  • Do same with “network.http.proxy.pipelining”
  • Find and click twice on “network.http.pipelining.maxrequests” and change its value to 8 (The default value would be 4).
Remember that, not every server supports pipelining. So, it can eventually diminish the performance of the browser. Simply, set the “network.http.proxy.pipelining” and “network.http.pipelining” to ‘False’ in case of any problem.

Tweak for Faster Loading

Firefox sometimes enters into a low frequency interruption mode and becomes less responsive. You cannot even move the mouse or type with your keyboard for a while. It is nothing but the content switch threshold but the page tends to load more swiftly. Decreasing the content switch threshold could ultimately pick up the performance & your firefox will load faster.
  • Go to “about: config” page
  • Now, right click and then choose New, then Integer.
  • Enter “content.switch.threshold” in the box and hit OK. Now, type 250000 in the next box and hit OK to save.

Enhance the cache limit

When you surf on the web, the Firefox saves scripts and images of websites in the local memory cache. It is then quickly retrieved when you visit the same website again. If your PC has enough RAM (normally 2 GB or more), you can increase the cache limit to decrease the page loading time and increase the performance.
  • Go to “about:config” page
  • Right click and select New, then Integer.
  • Type in “browser.cache.memory.capacity” and click on OK button.
  • Type ‘65536’ in the next box and OK.
Now, restart Firefox and get bigger cache memory.

Use TraceMonkey

Mozilla Firefox has introduced a new feature called “TraceMonkey”, which converts the slower JavaScript in super fast x 86 modes. By this, you can run specific functions incredibly faster.  It is still in the Beta mode and has few bugs. Hence, it is not yet available on the Firefox download site. If you like to take risks on your own, try this out by following method.
Install and run the latest version of nightly. Type “about: config” in the address box and hit Enter. Find and double twice on “javascript.options.jit.content” and “javascript.options.jit.chrome “. Alter values to True and done. You are now running the high-speed JavaScript engine in your Firefox.

Sunday, 25 November 2012

Speed Up Boot Process Time for windows


It is very much frustrating to wait for windows to boot. It takes a minute or two, but it is a tacky affair. Everyone wants to speed up  boot process no matter they have an old desktop computer or a new and latest laptop.
Speed-Up-Boot-Process-Time-for-windows

Here are some of the ways, which can help you to speed up boot process of your computer. This will increase the speed of the computer and its booting will be quicker than before. These ways are quite simple.

Boot-Scan your PC
Sometimes your antivirus fails to detect a virus/malware during virus scan so, it is advisable to Boot-Scan your PC regularly.  a Boot-Scan will work magically to speed it up. Its my personal experience every-time i Boot-Scan my PC it increase my PC’s overall performance & makes my PC
virus free.

Enable Quick Boot from BIOS
When you first set up your computer, BIOS is set up. This is done to make things convenient for you. However, those things can be immobilized once you set up.

This setting of Quick Boot will turn off the tests that your computer runs when turned on. The boot priority tweak will direct your computer not to go through thumb drives, CDs, floppy disks or any other media when it first starts. All this will help you to boot into your OS quicker.

Remove unnecessary fonts
Every font, which is installed on your computer loads whenever you start your windows. Obviously, more the number of fonts slower will be the speed at which windows will load. It is advisable to keep the font list closer to 300-400 although you can safely load 1000 fonts. Be careful while deleting any fonts unless you are very sure that they are not needed. Fonts such as Arial, Verdana, Times New Roman, Tahoma and Courier New should not be anyway deleted.

Use a static IP
Give your computer a static IP address. It always remains the same and never changes. To know your static IP, you can contact your ISP. Static IP can save a lot of time when you up your computer.

Filter Programs that run at startup
You can speed up the booting process by deleting the unnecessary programs that launch and run at startup. These programs degrade the booting performance. You can immobilize the applications that are needed by you at startup.  It is advisable to disable most of such applications except the antivirus program.

Disable unused Hardware
Booting of your computer can be boosted by disabling the unused hardware such as floppy drives, bluetooth devices etc. It is so because when your computer starts a lot of hardware drivers are loaded. This consumes quite a bit of time, which can be reduced by disabling such drivers. Simply go to device manager and right click on the device you want to disable. It will also speed up PC.

Upgrade your RAM
A superior RAM can help you to boot your PC fast. It is an effective way to increase the speed of your computer. Also, you can make use of a separate graphics memory. It will also help you to speed up PC.


Updated Antivirus
There are some malwares that can slow down the speed of your computer. So, it is advisable to install any antivirus software. Also, keep it updated and run frequent scans. Your PC will be much secure and faster.

Sunday, 11 November 2012

Easiest Way to Install Windows 7, Windows 8 or Vista From USB


If you have an desktop with DVD writer or laptop with DVD writer then, you can easily install your Windows 8, 7 or Vista with bootable Windows disc but, what to do if your PC is old or you have a netbook which doesn’t have DVD writer ? In that case you can install your Windows with USB Flash Drive. I am going to tell you the easiest way to install Windows 7, 8, Vista with USB Flash Drive.

Requirements:


A USB Pendrive with minimum of 4 GB capacity or a Memory Card of 4 GB + USB Card reader
A Windows Vista, 7 or 8 ISO file.

Step by step instructions:

  • Firstly, Open Universal USB Installer by double clicking on its icon.

  • After Universal USB Installer box opened Click on I Agree.

  • Then, click on the Drop Down Menu marked as No.1 in image below & select Windows 7 Installer if, you are going to install Windows 7 or Windows 8 Developer Preview (Process is same for both Windows 7 as well as Windows 8 Developer Preview) or select Windows Vista Installer if, you are going to install Windows Vista.
  • Then, click on the Browse Button marked as No.2 & locate your Windows 7, Windows Vista or Windows 8 developer preview ISO file.
  • Then, click on the Drop Down Menu marked as No.3 & select your USB  Drive from the list (the drive you will select will be your bootable drive).

  • Click on Create Button & you will see window as in image below. Process will take some time to complete.

  • After Process completion you will see as below.

  • Then, Plug your Bootable USB drive to the PC where you want to install your Windows Developer Preview, Windows 7 or Vista.
  • Then, Start your PC & press F2 or F12 on your keyboard to open Boot Menu (it can be different for every manufacturer).
  • Then, Change your Bootable device to Bootable USB Drive created by you in previously step.
  • Windows setup will start copying files & you will see your Install Now button, click on Install Now button & Select or Create partition on your hard drive where you want to install your new Windows & start installation process, Windows setup will show you further instructions follow those instructions & after installation process your new Windows will ready to use.

Tips: Universal USB installer is a very good, tiny, free & handy tool to install Windows as well as many other Linux distributions.

Please share us and like us........


Monday, 29 October 2012

Installing Windows 8 From USB Drive 3 Software with links

Hello Friend Nicejattz are now tell you how to install window 8 with a USB.Window 8 is a newest operating system and its very good featyres,so now I'm going to list below 3 easy options for you to put the ISO image of your Windows 8 copy onto a USB stick, then install Windows 8 to your computer from your USB stick instead of burning a DVD and wasting a disc. Installing from a USB drive shaves a few minutes or so off the install time. 


IMPORTANT NOTES: 


  • Make sure your motherboard is capable of booting off a USB stick or this will not work 
  • Backup any files on your USB stick because it will be formatted 
  • Make sure your USB stick is big enough to fit the Windows 8 ISO image 
  • If you are having trouble booting off your USB stick, make sure it is the first item listed in your boot order located in your BIOS settings


Also, this is important so remember this, after you boot from your USB key and it copies the Windows 8 files over and installs them, it will restart your computer to finish the setup. Make sure you unplug your USB key from your computer on the first restart so it doesn't boot off your USB key again and start the installation process over.

First Tool : Microsoft's Official Tool (Try This First) 
Download Microsoft's official tool to install Windows 7 from your USB stick, the tool was removed from Microsoft's website for a short time because evidently the tool violated the GNU’s General Public License (GPL) for using open source code, but Cnet has the file hosted. *UPDATE* Microsoft now has the tool listed on their website again. Links below:


http://download.cnet.com/Windows-7-USB-DVD-Download-Tool/3000-18513_4-10972600.html?tag=mncol;pop

*UPDATE* The tool can now be downloaded again from the MS Store:

http://images2.store.microsoft.com/prod/clustera/framework/w7udt/1.0/en-us/Windows7-USB-DVD-tool.exe


Second Tool : Use Unetbootin

I have found a much easier way to install Windows 8 from a USB Flash drive. Unlike other methods where you have to write complicated commands, this method can be completed even by those who have very little computer background.
The whole process takes only two steps, run UNetbootin, load the Windows 8 ISO file, and finally restart your computer. 
Before you begin, you will require the following:
  • USB Flash Drive (4GB minimum)
  • Windows 8 ISO Image file
  • UNetbootin
Now insert the USB drive, run UNetbootin, and select Disk Image as ISO. Browse your local drive for Windows 8 ISO that you downloaded and click Open. Now Select Type as USB and choose the drive. Once done, it will look like a bit similar to the screenshot shown below.
UNetbootin main windows  7
Click OK and it will begin extracting all installation files to the USB drive. The whole process will take some time(10-15 minutes), so have patience.
unetbootin installing windows 7 iso
Once the installation is complete, reboot your computer. Now while your system is starting up press the appropriate button(usually F1, F2, F12, ESC, Backspace, or Escape) to bring up Bios Boot Menu. Change the startup order to boot USB by default, usually you will have to press F6 to move the selected USB device on top. Once done, save changes and restart the system.
Third Tool : Use UltraISO 
2) Start UltraISO as administrator
3) "Burn" the iso image to the USB stick by following these steps
With UltraISO:
  • Open the image of Win8 with Ultra-ISO
  • Under BOOT-ABLE tab choose WRITE DISK IMAGE
  • Choose your USB stick under "Disk Drive"
  • Choose a method (It's recommended to use USB-HDD+)
  • Press Write
  • Make sure to change your BOOT order in BIOS to boot from your USB drive first
Please Give some comments and Like this post 


Sunday, 28 October 2012

Window 8 Shortcut Keys


Window 8 Shortcut Keys
Hello Friends it not too easy to operate window 8 if you are new.Window 8 is the new version of microsoft. If you want to operate window 8 easily this topic will help you we tell you some Win 8 Keyboard Shortcuts which help you to operate with 1-2-3 click easy.so enjoy this topic like us

Read Also : SKYPE FOR WINDOW 8 REVIEW


  1. Windows logo key + start typing: Search your PC
  2. Windows logo key + H: Open the Share charm
  3. Ctrl+plus (+) or Ctrl+minus (-): Zoom in or out
  4. Windows logo key + C: Open the charms
  5. Windows logo key + F: Open the Search charm
  6. Windows logo key + I: Open the Settings charm
  7. Windows logo key + O: Lock the screen orientation
  8. Windows logo key + Z: Open commands for the app
  9. Windows logo key + K: Open the Devices charm
  10. Windows logo key + PgUp: Move the Start screen and apps to the monitor on the right
  11. Windows logo key + PgDn: Move the Start screen and apps to the monitor on the left
  12. Windows logo key + Shift+period (.): Snap an app to the left
  13. Windows logo key + period (.): Snap an app to the right

Friday, 21 September 2012

Increase YouTube views with legal way

Hello Guyz Today i tell you how to increase YouTube vies,likes,subscribes just simple steps and you get more views on your YouTube videos it helps to increase your earning and maintane ctr of your videos.


Steps :
1. open URL http://bit.ly/P51t1f
2. Register yourself.
3. You get 50 points when you log in.
4. Every day you get 50 points.
5. You have to watch some videos and you get 1:2 if you watch 3 videos your video views increase to 6.
try i really like this service


Sunday, 19 August 2012

Show your name in the System Clock


This trick will put your name or any text up to 12 characters long in the system clock. There is nothing special in this trick. It is just to show off to your friends that you are Genius. okayy..


Here is how to do it.

1. Go to Control Panel and double click onRegional and Language Options.
2. Click on Customize and go to Time tab.

3. To put your name, just click on the scroll down text and rename it with anything you want. Like you see in the above image, I put “Cypher” beside the AM and PM.
4. Finally, click Ok and Ok to accept the changes.
Just incase you want to get back to the original setting, just pick the AM and PM from the drop down list. Using Windows Vista? Don’t worry, this trick is also works in Windows Vista.
Warning: This does not only effect the clock at the taskbar but it is also changes the whole clock system. Press F5 in notepad to confirm.